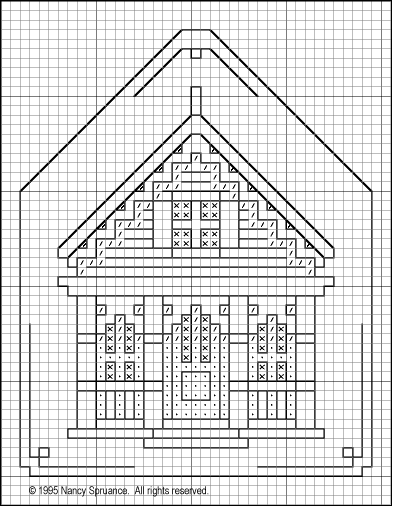
 DESIGN
AREA: 37w x 47h.
(Cottage only - 29w x 38h)
 DESIGN
AREA: 37w x 47h.
(Cottage only - 29w x 38h)
FINISHED SIZE: 2-5/8"w x 3-3/8"h on 14 count fabric. (Cottage only - 2"w x 2-3/4"h)
MATERIALS: Black embroidery floss and white or off-white Aida, Zweigart® Aida Plus™ or other evenweave fabric.
INSTRUCTIONS: Using one strand black floss, work all backstitches first then fill in with cross stitches and half cross stitches as indicated on the chart. The darkest areas of stitching (x=2 strand cross stitch) are best worked first before outlining with backstitches.
| 1 strand half cross stitch | |
| 1 strand cross stitch | |
| 2 strand cross stitch |
FINISHING: If you have used Aida Plus™, a plain piece of the same fabric can be fused to the back of the design. If another fabric was used, a Christmas plaid or print can be fused to the back of the design using medium weight fusible interfacing. Cut the interfacing larger than the design and iron on following manufacturer's directions. Trim the shape one row from the backstitched line.
A pretty finish to this ornament
is a ribbon hanger with bow using Kreinik's metallic 1/16"
ribbon in a color to coordinate with your backing fabric. Thread
a tapestry needle with a 12" length of ribbon. Poke the needle
through the front on the right of the square at the top, then
back through the left side of the square. If you want to finish
the tails with an overhand knot, do it now. Even out the lengths
in front leaving a 1" to 1-1/2" loop in back. Make a
bow and enjoy the ornament.
This design may be used freely
for personal use. It may not be re-sold, kitted, or distributed
in any way without permission from the copyright holder. For permission
to reprint or otherwise distribute this design, please e-mail
nancy@nspruance.com